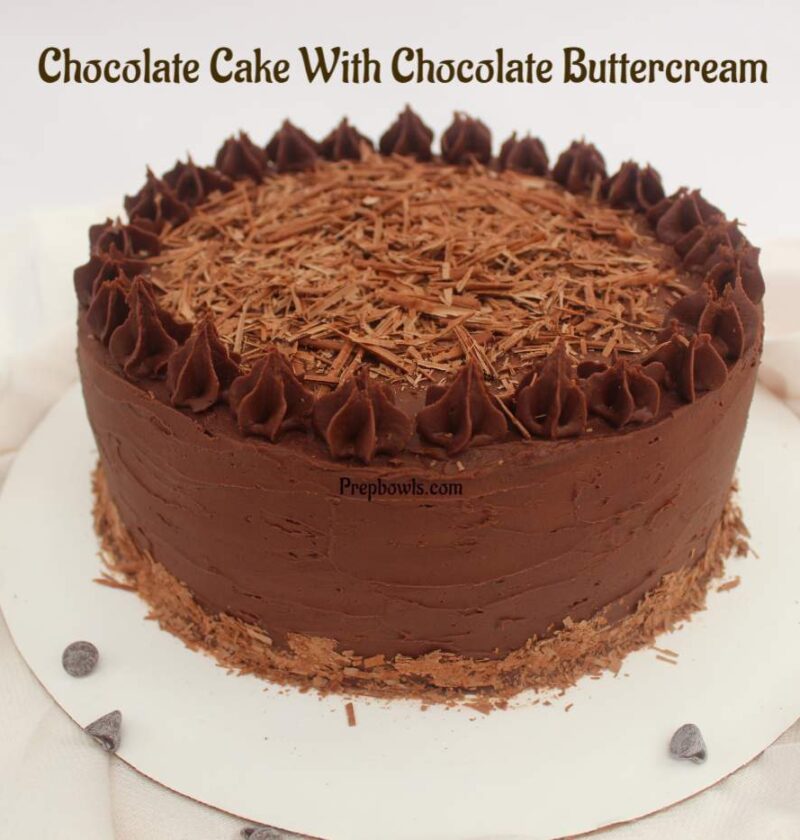
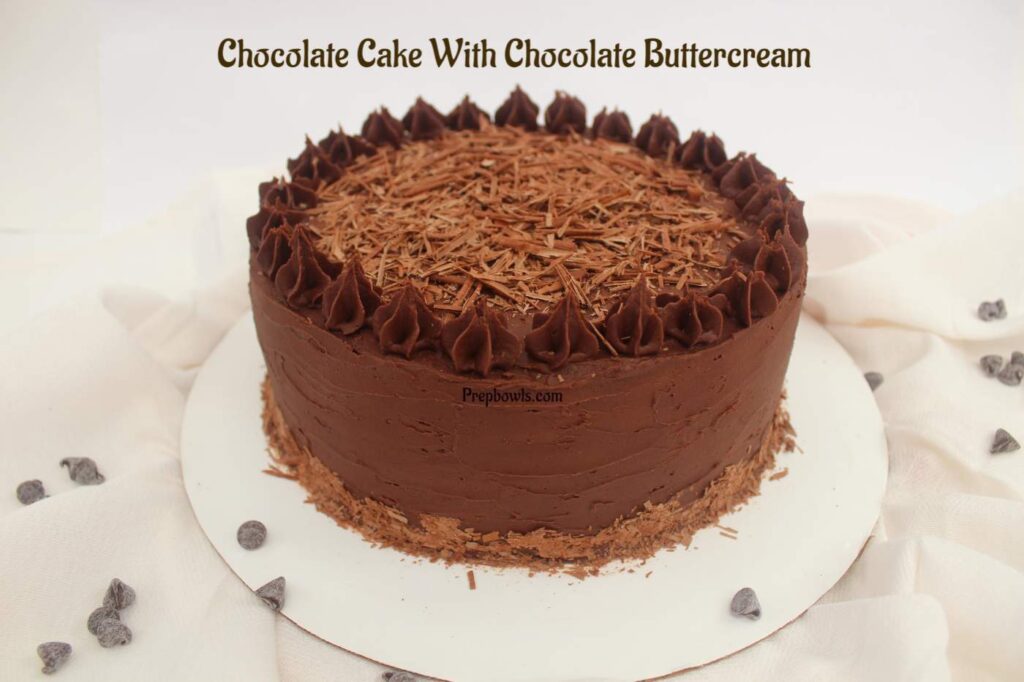
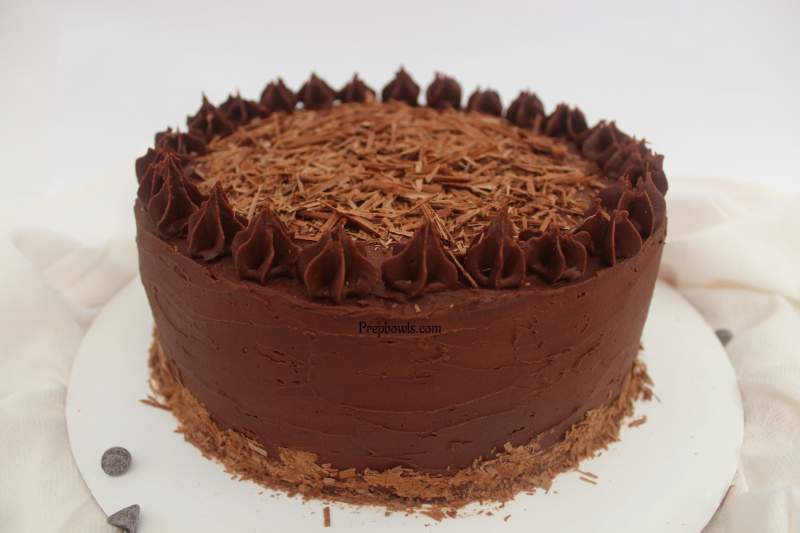
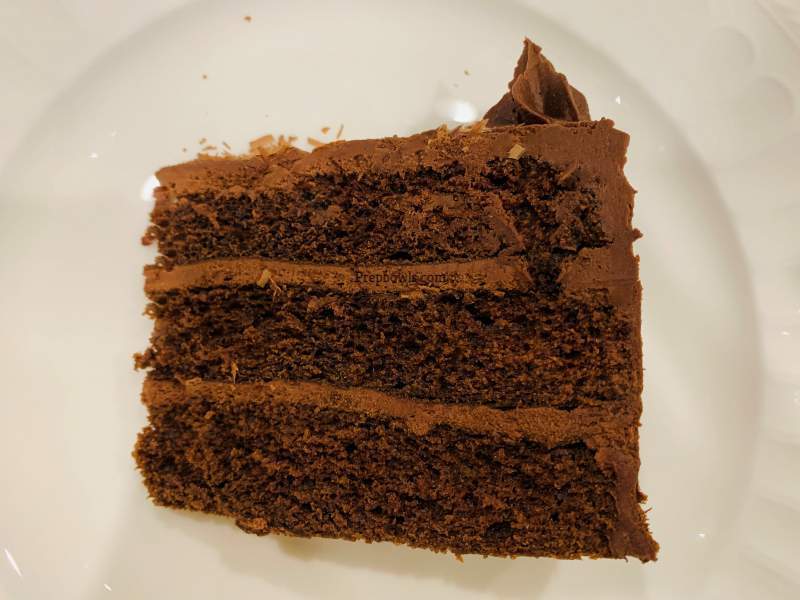
This cake is a three layered chocolate flavor eggless cake recipe, and frosted with scrumptious chocolate buttercream. Cake texture is soft with moist crumb, and the chocolatey flavor is super addictive. Perfect cake for birthdays, special occasions or simply make it and enjoy for the dessert craving. Cake is very easy and simple to make, just mix cake ingredients using a hand whisk /spatula, and bake ( no electric beater is needed for making the cake batter). This Chocolate buttercream recipe is the easiest buttercream I’ve ever made, it turns out super smooth and silky, and perfect spreadable consistency. Recipe includes detailed instructions for the cake and buttercream with stepwise pictures and tips.
My kids and my niece are very much a chocolate lover, my only option when baking their birthday cakes is chocolate flavor. This time it was my younger one’s birthday, and he turned two, cannot believe how time flies. So Diya (my niece) and AJ (my elder one) wanted me to bake a chocolate cake with chocolate frosting. Kids helped me in baking and decorating the cake, it was a total fun, and they absolutely loved the outcome.
As I have mentioned above, this cake recipe doesn’t use any eggs, instead I have used club soda as an egg substitute in this cake recipe. Surprisingly this substitute yields cake texture which is similar to the cakes baked with eggs. The cake were spongy, moist and soft on the inside with a crisp top. I have tried using other substitutes, but wasn’t happy with the outcome. Best substitute so far I have used is soda.
For the sweetness of the cake, I used only condensed milk and no other sweetener is added. Natural unsweetened cocoa powder gives the cake the deep chocolate flavor and color. Serve the cake as it after baking it, without frosting it, like a tea time cake. Or dust the top of the baked cake ( when its still warm) with powdered sugar and serve with a scoop of ice cream, it tastes delicious.
How to bake three layer cake if you don’t have 3 equal size baking pans?
I used three 9 inch cake pans to bake 3 cakes at the same time, it saves time as well. But if you don’t have three pans /smaller oven then weigh the batter equally for the 3 cakes and bake one portioned batter at time. Baking time for one – 9 inch cake will remain the same 9 – 10 minutes approximately ( if using 9 inch cake pan).
Another method – bake one single tall cake with the prepared batter. Baking time will depend on the pan size (approximately 25 to 30 minutes , once the cake is baked you’ll see the sides of the cake will leave the pan). So make sure to keep an eye on the cake when it is baking.
After the cake is baked and completely cooled down to room temperature ( very important to cool the cake), carefully slice the cake into two using an extra long serrated knife ( or cake slicer / cutter). Start cutting the cake from one end, and slowly slide the knife to the other end of the cake (make sure to use one hand to cut / slide through , and place the other hand on the top of the cake, and move the turn table ( if using one). For even slicing, use a adjustable cake cutter / leveler specifically designed to cut different height cakes , available in Amazon online or Michaels craft store , hobby lobby in USA . Note – This method will yield only two cake, you can slice more layers if you want to.
What soda to use?
I used Walmart brand ( great value) club soda. I recommend to buy the low sodium club soda which is sold in 6 counts mini bottles, each is 8.5 fl oz from Walmart USA. These small bottle are easy to use for one time. Once the bottle is opened, the gas will not be effective as the newly opened once, so I highly recommend to buy these.
You can use other brands club soda too available in the market. Tips – Buy Soda in the cans for longer shelf life. Make sure to open the seal of the bottle /can just before adding it to the cake (you need that fizz /gas). One important thing is to check for the expiry date on the soda. Its need to be within the date of expiry , else the fizz may not be there.
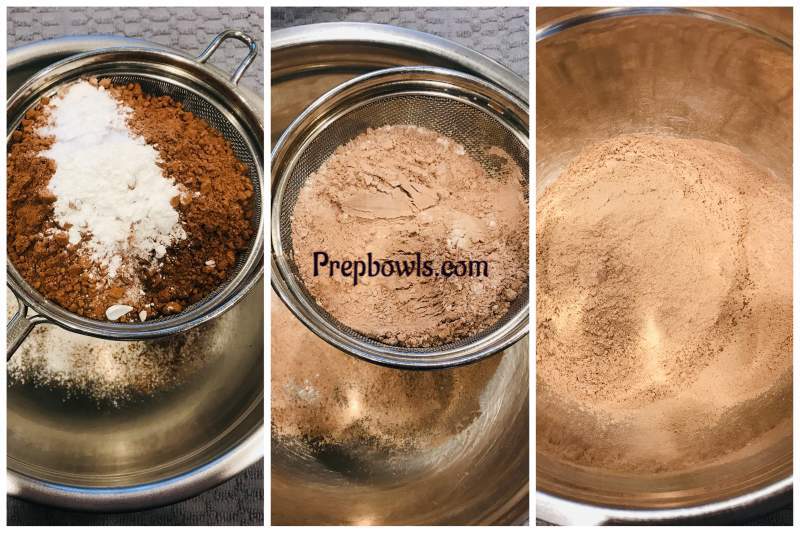
Why sifting the dry ingredients is important?
By sifting all the dry ingredients, it helps to remove any small lumps, and to distribute it evenly. It also aerates the flour, and makes it easier to incorporate. Highly recommend to sift all the dry ingredients together for at-least two to three times. This will strongly help the batter to rise well and for a better cake texture.
What to do if the cake is overbaked, dry or if you want the texture of the cake to be very moist like they sell in the Indian bakeries in USA?
Take equal measure of water and sugar in a sauce pan, and heat in medium -low flame, until the sugar is melted ( don’t have to wait until the boiling point is reached), cool down. After the cake is baked and cooled down to room temperature, before spreading the frosting, ( poke holes on the cake with a toothpick – optional) using a brush spread the prepared sugar syrup on the cake, and then spread the buttercream. Make sure to use the brush and only moisten the cake layer evenly and do not pour the syrup, this helps to moisten the cake well( and this is completely optional) .
How to bake level cake?
I use “Bake Even Cake Strips” by Wilton brand , sold in Amazon online or Michaels craft store , hobby lobby in USA. Cake Strips are made of thick cotton, Its loops secure them to the cake pans, which is a baking tool to bake moist level cakes. The strips is oven safe. You have to soak the strips for at least five minutes in cold water before using it. Also read the instructions provided with the strips before using it. Note – After pouring the cake batter to the baking pans, make sure to tap the pans gently on the counter top to remove air bubbles, then tie the wet strips around the pan for baking.
How to make the buttercream more sweeter?
I used semi sweet chocolate baking chip for making this buttercream. And the sweetness of the buttercream is just perfect for us and not overly sweet. But you may use milk chocolate baking chip instead, which will give more sweetness to the buttercream.
This buttercream is only two ingredients recipe ( chocolate chip and butter) , you can add one cup of confectionery powdered sugar for more sweetness. Add the sugar at the end when using the beater /kitchen aid to beat the cream for two minutes ( see below for recipe instructions). And 1 tsp of vanilla extract can also be added with powdered sugar for flavor, but this is optional.
Can I use salted or unsalted butter for making the buttercream?
In this recipe I used unsalted butter, but it is personal preference to use either salted or unsalted butter ( both will work for this recipe).
Notes / Yield on the buttercream
Given buttercream recipe will yield enough for frosting one 9 inch layer cake or frost 24 to 30 cupcakes. Can make the buttercream ahead of time and refrigerate it in an air tight container for up to a week, allow it to come to room temperature for spreadable consistency before frosting or piping.
How to store the cake leftover or the full cake after frosting it ?
Store leftover in the refrigerator, cut into required slices and store the cake in air tight box . Before serving it, bring the refrigerated cake to room temperature or if you want it immediately then , microwave each cake slice for 5 to 10 seconds only ( chocolate frosting and cake will moisten well, and will taste so fudgy and yum!
I have baked and frosted the entire cake a day before the event and stored the cake in the cake box in the refrigerator. It works perfectly fine. Make sure to leave the cake outside from the fridge for 1/2 hour to one hour or more depending on the room temperature before cutting it.
Cake yield and serving size ?
This recipe yields Three layer 9 inch cake, easily serves 16 to 22 people.
Other cake recipes with stepwise pictures in the blog,
- Eggless Black Forest Cake
- No Bake Cold Stone Creamery Style Oreo Ice Cream Cake – A Semi Homemade Cake recipe
- Easy Tiramisu Recipe – No Bake Dessert
Other Baking Recipes , I’ve listed few below. For the complete list of recipe check the link here – Baking Recipes.
- French Macarons With Mango Buttercream – Detailed Instructions , Tips, FAQ’s And Answers Given.
- Easy Pumpkin Crinkle Cookies Recipe
- Creamy Buffalo Chicken Pizza Instant Pot
- Easy Pizza Dough Recipe Instant Pot
Step by step pictures of how to make the chocolate cake and chocolate buttercream
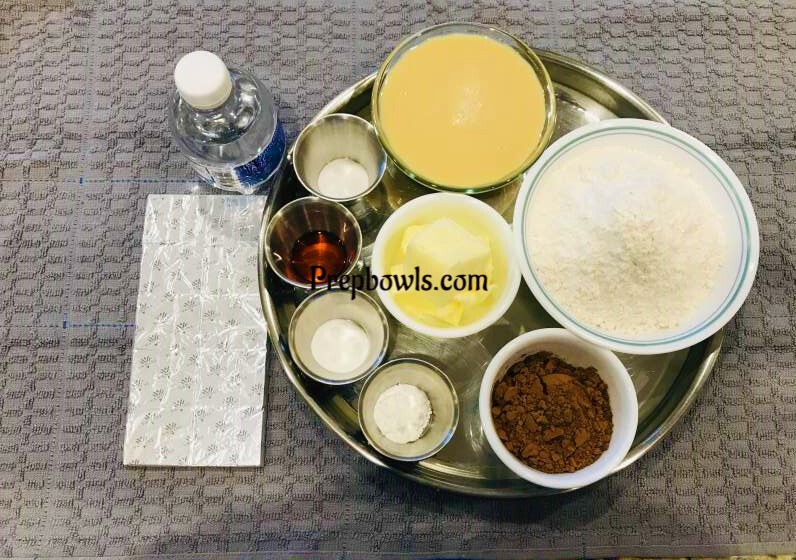
Measure and keep the ingredients ready for the cake – All purpose flour / maida , condensed milk , salt , butter, vanilla extract , baking soda, baking powder , cocoa powder heaped, and aerated soda (Do not OPEN yet ), and cake pans.
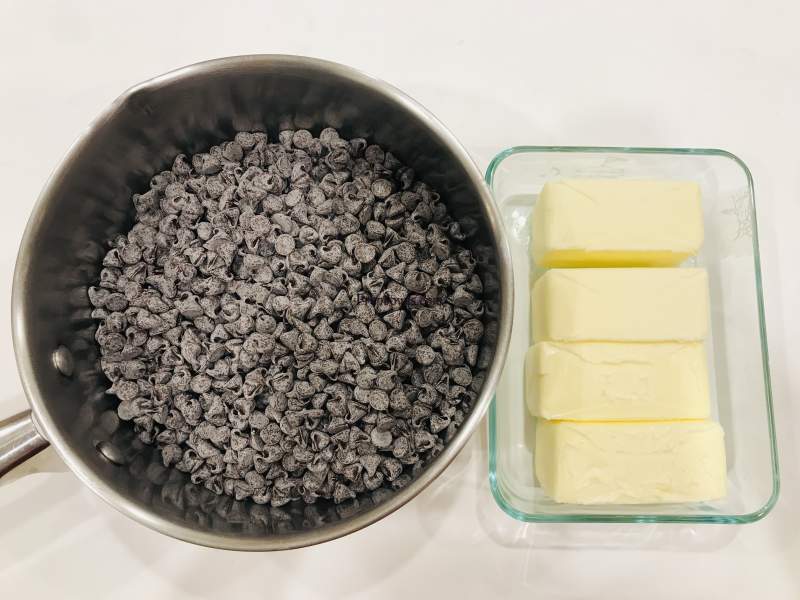
For the frosting – semi sweet chocolate chips and butter.
Making the cake
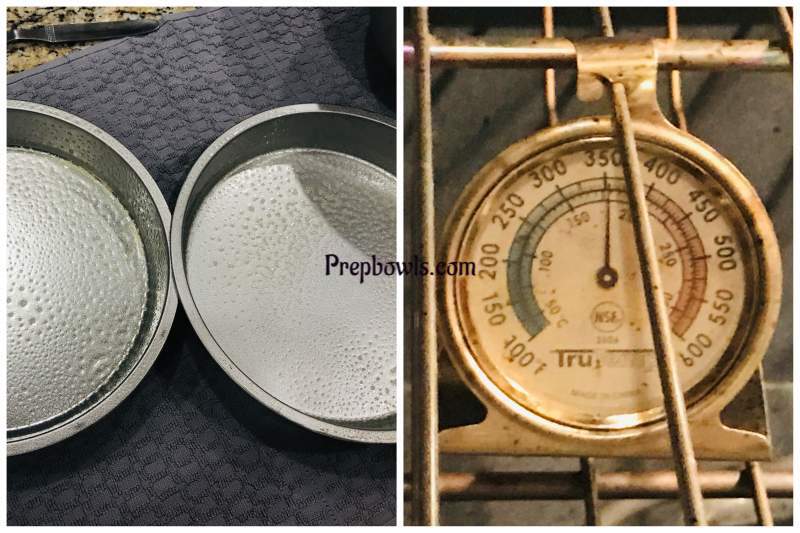
Grease the three baking pans fully, by spraying any cooking oil / butter. Preheat the Oven to bake mode to 350 F / 180 C (Use a external oven thermometer for accurate oven temperature, highly recommend using one).
Now take All purpose flour , Cocoa powder , salt , baking powder and baking soda, and SIFT / SIEVE them altogether, at least 2 to 3 times using a sifter ( dump all ingredients into the sifter over a mixing bowl, Holding the handle with one hand and tapping the sieve gently with the other hand, the flour will slowly sift through), set aside.
Next take a wide bowl, add soften butter , condensed milk vanilla extract, and beat /whisk them well using a hand beater, set aside.

Now OPEN the aerated soda and measure 200 ml , Take the condensed milk mixture , Flour mixture and keep all the three ready.
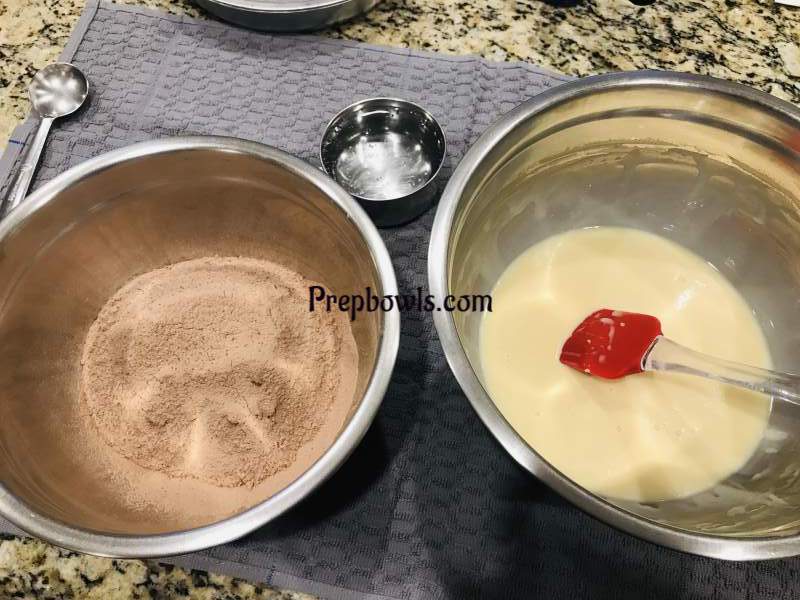
Take the condensed milk mixture , add some of the sifted flour, use a SPATULA, Cut and Fold both mixtures gently. Now add few tablespoon of soda into the condensed milk mixture, and again slowly Cut and Fold the batter. (Add Sifted Flour, and soda ALTERNATIVELY to the condensed milk mixture, until all the flour – soda are fully used up).
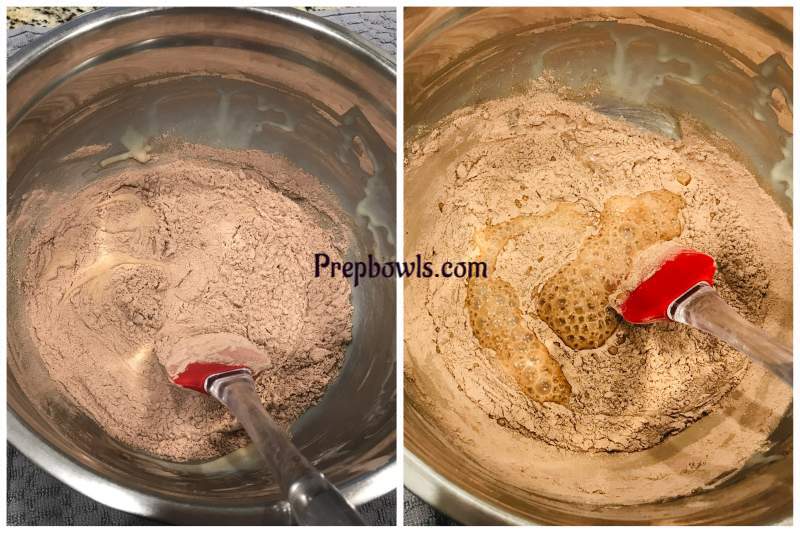
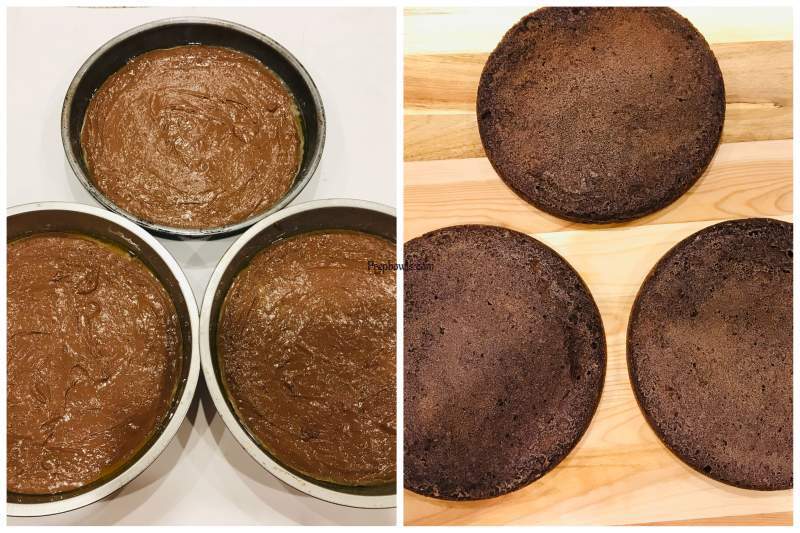
Combine them well using the spatula only ( do not overmix). Divide the batter into three equal halves (measure them equally using a kitchen scale ). Pour the batter into the greased cake pans, and gently tap the pans once or twice on the countertop to escape any air bubbles . Check if the oven temperature reached 350 F, put all three cake pans into the oven ( or one pan at a time , depending on the oven space) , and set the timer to 9 minutes (Keep an eye from 8 minutes , mine baked at 9 minutes). Remove the cake from the oven, check if cake is baked fully, by pricking the tooth pick in the center of the cake and it should come out clean (few light crumbles sticking to the toothpick is okay, it should not be moist / wet , or when the cake is baking, you should see the edges of the cake leave the pan when the cake is completely baked). Cool the cake in the pan itself, before you take them out ( cake easily fall off the pan when fully cooled down to room temperature).
For making the chocolate buttercream frosting
Add both the chocolate chip and butter in a deep pan , place the pan on the stove top in medium – low flame only. Stir it well using a spatula or ladle , make sure to scrape the bottom of the pan and mix until the chocolate – butter melts fully. It will turn into a very thin – runny consistency. Now turn off the flame , remove the pan from stove, let is rest for ten minutes( slightly cool down). Transfer the mixture to the kitchen aid – mixing bowl attachment ( if using , or transfer to the bowl you’re going to beat the cream). Cover the bowl with clear wrap , and put the bowl in the refrigerator until the chocolate becomes hard to touch ( may take one hour or more ) (To speed up the process -recommend doing this step ( melting and refrigeration of the chocolate) first before making the cake ).
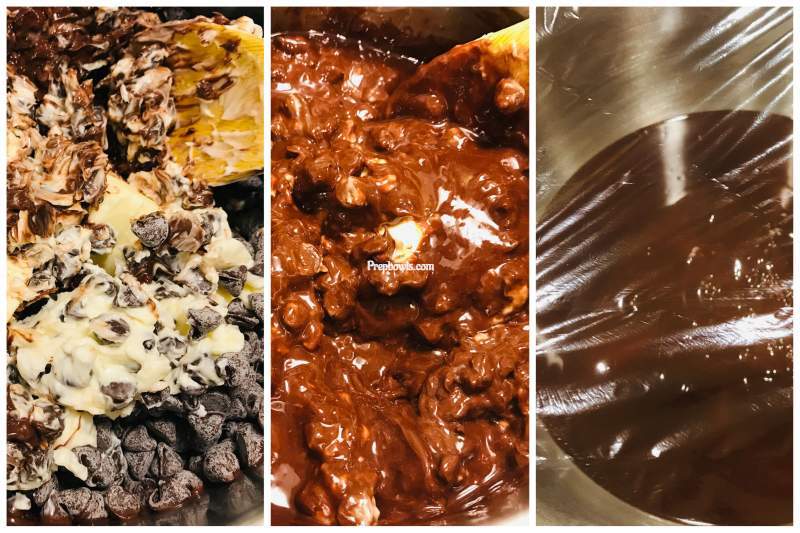
Remove the bowl from fridge, let it come to room temperature (approximately 30 minutes). Use a ladle, scoop and break the chocolate into smaller chunks.
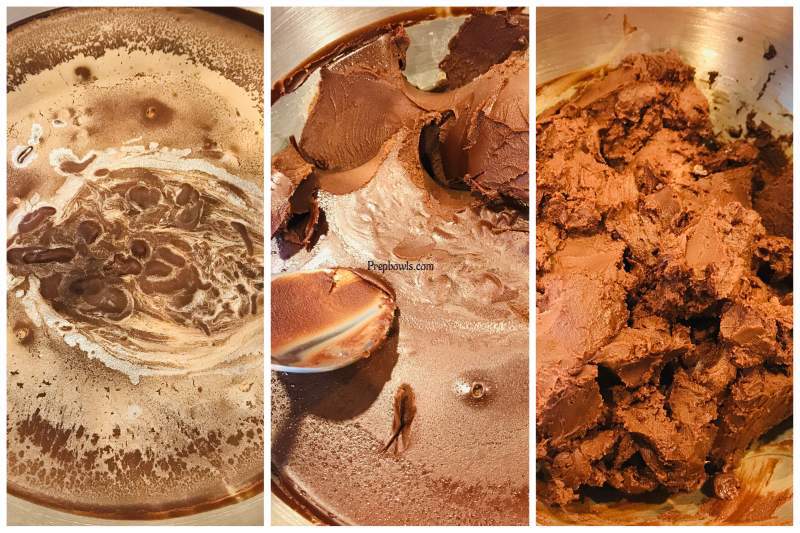
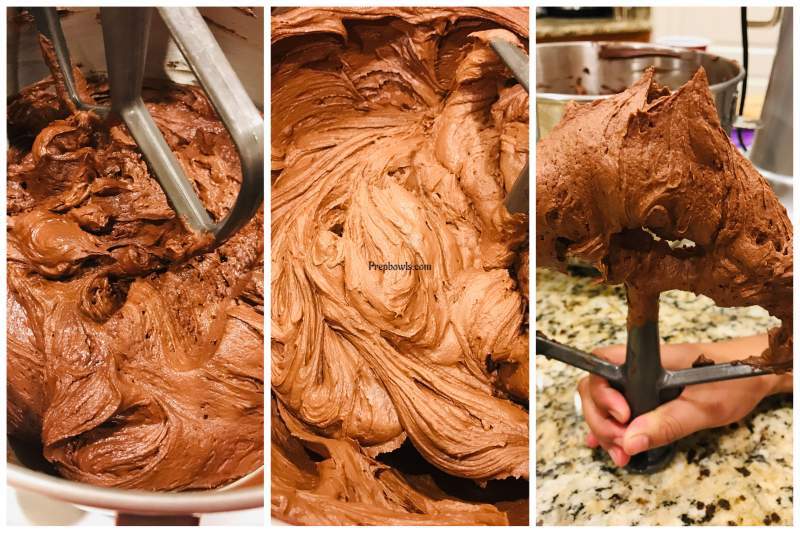
Place the bowl in the kitchen aid fitted with paddle attachment , beat in medium speed for only TWO minutes ( I went upto 8 speed). You’ll notice the cream changes color from deep brown to light brown color ( color deepens as the frosting sits ), and texture will turn light and fluffy. (After two minutes, if you notice the cream on the sides did not mix well, then scrape the sides and bottom with rubber spatula, and beat for an extra 30 seconds ). Buttercream is ready to be pipped or spread on the cake.
Assembling the cake
Take a round shaped cake base board and add a ladle full of the prepared frosting on the base board, in the middle to stick the cake. Remove the cakes out of the pans, place the first cake (turn the top side of the cake facing down) and place it over the base board circle (top of cake becomes bottom). Spread some buttercream over the cake ( leave 1/4 inch space at the edges without spreading the cream). Now place the second cake on top of the cream , spread some buttercream , finally place the third cake on top ( top of the cake becomes bottom – so the top most layer is even).
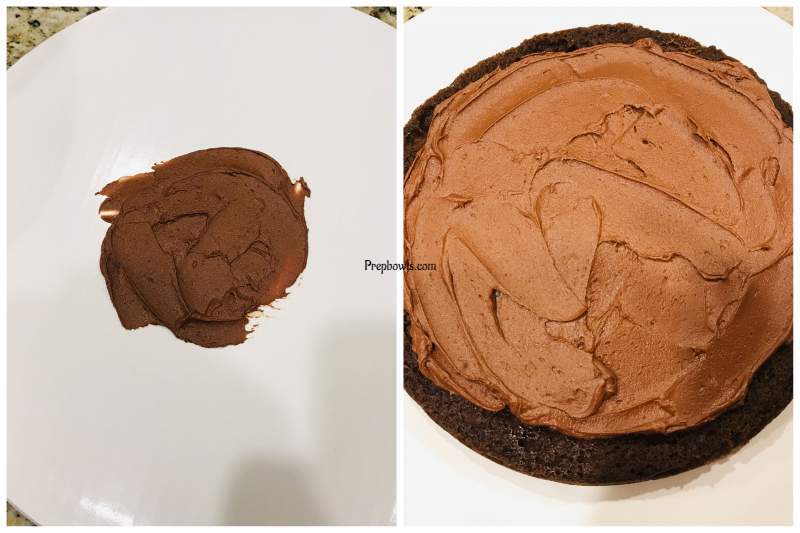
Note – If you want to pipe and decorate the cake on top with frosting ( like I did on the cake picture), then RESERVE some cream before spreading it on the entire cake (optional). Now add the remaining buttercream on the top, and start spreading the top and sides of the cake evenly with the cream.

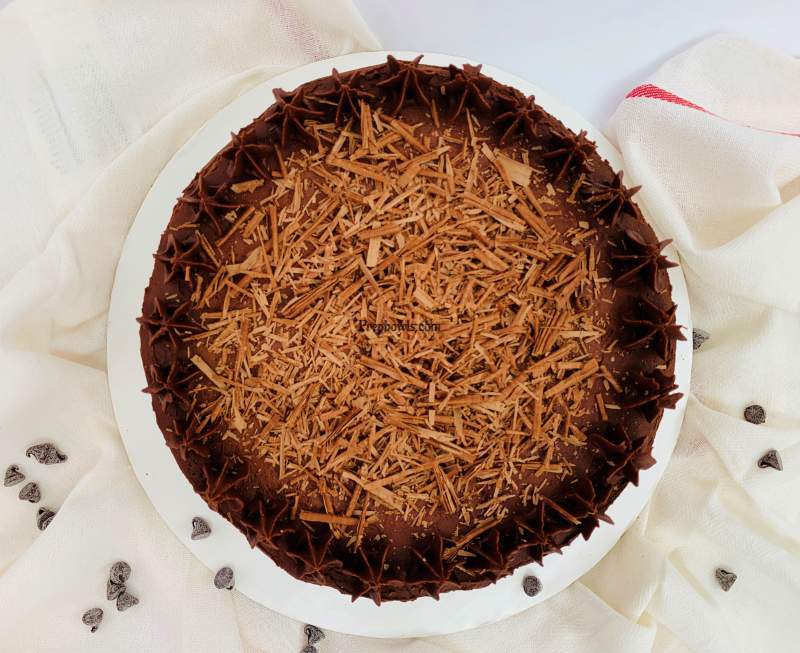
Decorate the cake as you wish ( there is no end for perfecting – decorating a cake ) – Add the reserved cream to a pastry bag fitted with a large size star tip and pipe them on top of the frosted cake. Take the chocolate bar and shave the chocolate (using a knife) or peel ( using a peeler ) . You will get chocolate curls / shavings. Can also decorate bottom edge of the cake with the chocolate shaving (for sticking shaves to the sides – use your hands and take some chocolate shavings and gently stick them on the cream) .
Ingredients
- For Making The Chocolate Buttercream Frosting
Instructions
-
Preparation
- Measure and keep the ingredients ready for the cake - All purpose flour / maida , condensed milk , salt , butter, vanilla extract , baking soda, baking powder , cocoa powder heaped, and aerated soda (Do not OPEN yet ), and cake pans. For the frosting - semi sweet chocolate chips and butter. Making the Cake
- Grease the three baking pans fully, by spraying any cooking oil / butter. Preheat the Oven to bake mode to 350 F / 180 C (Use a external oven thermometer for accurate oven temperature, highly recommend using one). Now take All purpose flour , Cocoa powder , salt , baking powder and baking soda, and SIFT / SIEVE them altogether, at least 2 to 3 times using a sifter ( dump all ingredients into the sifter over a mixing bowl, Holding the handle with one hand and tapping the sieve gently with the other hand, the flour will slowly sift through), set aside. Next take a wide bowl, add soften butter , condensed milk vanilla extract, and beat /whisk them well using a hand beater, set aside. Now OPEN the aerated soda, measure 200 ml and keep it ready.
- Take the condensed milk mixture , add some of the sifted flour, use a SPATULA, Cut and Fold both mixtures gently. Now add few tablespoon of soda into the condensed milk mixture, and again slowly Cut and Fold the batter. (Add Sifted Flour, and soda ALTERNATIVELY to the condensed milk mixture, until all the flour - soda are fully used up). Combine them well using the spatula only ( do not overmix). Divide the batter into three equal halves (measure them equally using a kitchen scale ). Pour the batter into the greased cake pans, and gently tap the pans once or twice on the countertop to escape any air bubbles . Check if the oven temperature reached 350 F, put all three cake pans into the oven ( or one pan at a time , depending on the oven space) , and set the timer to 9 minutes (Keep an eye from 8 minutes , mine baked at 9 minutes). Remove the cake from the oven, check if cake is baked fully, by pricking the tooth pick in the center of the cake and it should come out clean (few light crumbles sticking to the toothpick is okay, it should not be moist / wet , or when the cake is baking, you should see the edges of the cake leave the pan when the cake is completely baked). Cool the cake in the pan itself, before you take them out ( cake easily fall off the pan when fully cooled down to room temperature). For Making The Chocolate Buttercream Frosting
- Add both the chocolate chip and butter in a deep pan , place the pan on the stove top in medium - low flame only. Stir it well using a spatula or ladle , make sure to scrape the bottom of the pan and mix until the chocolate - butter melts fully. It will turn into a very thin - runny consistency. Now turn off the flame , remove the pan from stove, let is rest for ten minutes( slightly cool down). Transfer the mixture to the kitchen aid - mixing bowl attachment ( if using , or transfer to the bowl you're going to beat the cream). Cover the bowl with clear wrap , and put the bowl in the refrigerator until the chocolate becomes hard to touch ( may take one hour or more ) (recommend doing this step first before making the cake ).
- Remove the bowl from fridge, let it come to room temperature (approximately 30 minutes). Use a ladle, scoop and break the chocolate into smaller chunks. Place the bowl in the kitchen aid fitted with paddle attachment , beat in medium speed for only TWO minutes ( I went upto 8 speed). You'll notice the cream changes color from deep brown to light brown color ( color deepens as the frosting sits ), and texture will turn light and fluffy. (After two minutes, if you notice the cream on the sides did not mix well, then scrape the sides and bottom with rubber spatula, and beat for an extra 30 seconds ). Buttercream is ready to be pipped or spread on the cake. Assembling the cake
- Take a round shaped cake base board and add a ladle full of the prepared frosting on the base board, in the middle to stick the cake. Remove the cakes out of the pans, place the first cake (turn the top side of the cake facing down) and place it over the base board circle (top of cake becomes bottom). Spread some buttercream over the cake ( leave 1/4 inch space at the edges without spreading the cream). Now place the second cake on top of the cream , spread some buttercream , finally place the third cake on top ( top of the cake becomes bottom - so the top most layer is even). Important - If you want to pipe and decorate the cake on top with frosting ( like I did on the cake picture), then RESERVE some cream before spreading it on the entire cake (optional). Now add the remaining buttercream on the top, and start spreading the top and sides of the cake evenly with the cream.
- Decorate / Pipe the cake as you wish - Add the reserved cream to a pastry bag fitted with a large size star tip and pipe them on top of the frosted cake. Take the chocolate bar and shave the chocolate (using a knife) or peel ( using a peeler ) . You will get chocolate curls / shavings. Can also decorate bottom edge of the cake with the chocolate shaving (for sticking shaves to the sides - use your hands and take some chocolate shavings and gently stick them on the cream) .
Notes
*Using external thermometer for oven Is highly recommended , Oven temperatures can be inaccurate, using an external oven thermometer in your oven can be an easy fix for some of your cake baking problems. Using one will give you ACCURATE temperature readings.
*I baked all three cakes at the same time , you can bake one cake at a time, depending upon your size of the oven. Place the cake pan in the center rack of the oven ( instead of top or bottom - for even heat distribution).
*Use only a rubber spatula to cut and fold the flour mixture and soda to the condensed milk-butter mixture. Do not use a wire whisk or electrical hand mixer. Do not overmix.
*Avoid opening the oven door often in the initial minutes of baking ( cake will sink in the center).
*Make sure to grease the cake pan before pouring the batter , and after baking , let it cool down completely before removing the cakes from the pan.
*Sifting the all dry ingredients ( as mentioned above in the recipe) is important, it helps to remove any small lumps, and to distribute better. It also aerates the flour, and makes it easier to incorporate . Highly recommend to sift the mixture for at-least two to three times.
*Frosting - Some of the butter separates to the top ( you may notice a white layer) from the chocolates after melting or refrigeration , it is totally fine and normal.
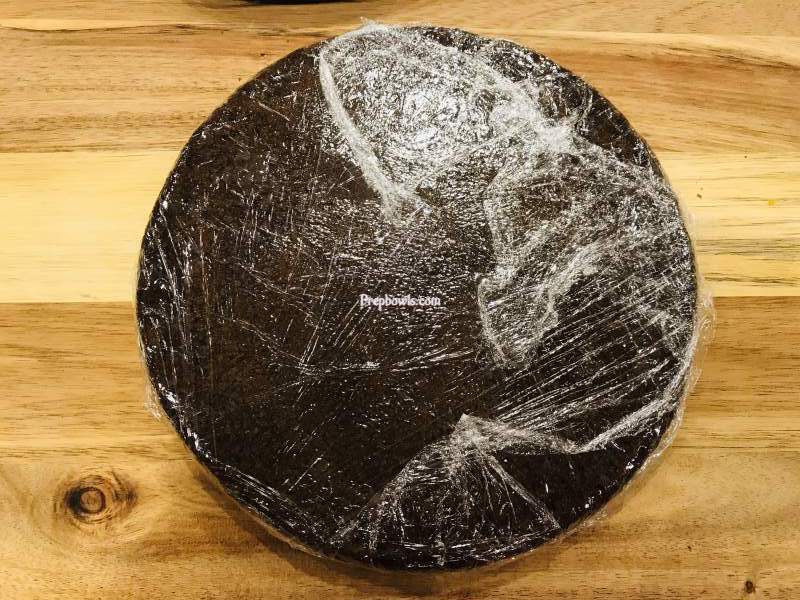
*You can always bake the cake ahead of time and refrigerate it ( use a clear wrap as shown in the picture below to wrap them before refrigerating it). Bring the cake to room temperature, make the buttercream the next day, and frost the cake.
*Other Cake Recipes , Stepwise pictures given for all recipes in the blog,
Other Baking Recipes
- French Macarons With Mango Buttercream - Detailed Instructions , Tips, FAQ's And Answers Given.
- Easy Pumpkin Crinkle Cookies Recipe
- Creamy Buffalo Chicken Pizza Instant Pot
- Easy Pizza Dough Recipe Instant Pot
I Love Hearing From You All !
If you like the Recipe , Please consider to love the post and comment below. Share the recipe link in Facebook, Twitter, Pinterest , Tumblr OR for Instagram mention @Prepbowls or tag #Prepbowlsaarthi. This helps more people to find the recipe online !
This chocolate cake looks moist and so yummy!
Totally agree, Josiah! Thank you!
Lovely cake ! I’m sure you had a fun time baking this delicious cake with your kids .Interesting to know about the soda being used as an egg substitute .Belated birthday wishes to your little one and am sure you all had a blast.
Thanks so much, Cake was a winner with the kids. Soda works like magic for eggless cakes, I totally love how the cake texture turns out with soda, when compared with other egg substitutes.
What a terrific cake! Perfect for birthdays. I want it when mine rolls around!
Thanks so much, It is so much fun to bake for a special occasion, especially for birthdays!
That was a great tip for using the bake even straps to ensure the cake is moist!
Glad to know it was useful, Thanks Heidi!
Aarthi your cake looks absolutely DIVINE! So light and airy and that frosting OMG I could seriously eat the whole bowl! Thank you for sharing such detailed tips! I’ve not ever made an eggless cake before but now I can’t wait to try!
Thank you, I’m happy know you like the recipe. This eggless cake recipe comes out perfect every time, so much better than the store brought eggless cakes. Surely do try it, I’m sure you’ll like it!
Hi Aarthi! Wishing you little one a very special birthday. This chocolate cake looks so decadent. I know that our boys would inhale this in less than a day. Love that it is eggless and your step by step photos are super helpful. Happy holidays to you and your family. Take Care
We truly enjoyed the cake, Thank you so much for the Wishes! Happy Holidays and Merry Christmas to you.
Aarthi, this chocolate cake looks absolutely delicious – I can’t believe you used soda as substitute for egg – what a wonderful idea. And that buttercream – yum! Lucky little kids – happy birthday to your youngest!
Thanks so much, Katerina! I make my eggless cakes using this secret ingredient, and it works like magic! Little kids at work, made it even more special!